If you are wondering how to create an e-commerce website on WordPress, then you have come to the right place. I have built several e-commerce and blog websites over the years, and I can tell you that after reading this article of mine, you will be able to build a very attractive and powerful e-commerce website with the help of WooCommerce and WordPress.
I will start by explaining the steps I took while building my website. If you want to build an e-commerce business or website, this tutorial will help you get started with confidence.
Building an e-commerce website may seem daunting at first, but if you follow the right approach, it can be an exciting and rewarding journey. But it’s very easy with just a few steps and your website is ready to sell. I’ll share my personal experiences, tips and tricks to make the process smooth and enjoyable. From choosing the right equipment to optimizing your store for success, this guide covers everything you need to know to build a thriving online business.

Why I Chose WordPress for My Ecommerce Store
When I first started exploring ecommerce platforms, I wanted something that was:
- Easy to use
- Highly customizable
- SEO-friendly
- Scalable for future growth
WordPress is a great way to build a website, and you can also use Wix instead. It offers a simple interface that makes it easy to create a website. WordPress has a lot of free and premium plugins and themes that increase the customization options of the website, ensuring that your store perfectly reflects your brand identity and increases the visibility of the website.
WordPress is an SEO friendly software. With SEO plugins like Yoast and Rank Math, you can optimize your website for search engines. As my business grew, WordPress and WooCommerce adapted seamlessly to handle increased traffic and product inventory.And the best part is that I was able to turn a website into a fully designed online store – without writing a single line of code.
1: Picking the Right Hosting & Domain
Before anything else, I needed a reliable hosting server. For an e-commerce business website, the website’s loading speed and security are also important aspects to consider.

What I was looking for:
Fast website loading speed:
A slow website can turn away customers, so I recommend a hosting company with excellent speed performance and security.
Free SSL Certificate:
Security is very important for e-commerce businesses, and SSL certificates keep customer information safe and are essential for growing your website’s customer base.
One-click WordPress installation:
This WordPress feature makes installing a domain name on WordPress very easy and saves a lot of time.
WooCommerce compatibility:
The hosting provider you use is essential for WooCommerce.
I personally recommend Hostinger or Bluehost — they have never disappointed me. Both offer reliable performance, great customer support, and very affordable plans.
Then came the domain name. I chose something short, memorable, and brandable. Tools like hostinger and GoDaddy made the process extremely easy. And you have to see if the domain is available.
2: Installing WordPress & Choosing a Theme
After getting your hosting and domain ready, next is installing WordPress – the backbone of your site. Most modern hosting providers make this easy with a one-click install available directly from your dashboard. You don’t need to put any effort into doing this. To install, select WordPress from the menu, and click Install. Within minutes, your website will be ready to design.

Choosing the right theme:
Choosing the right theme is very important because the theme decides how my e-commerce store will look and feel.
I wanted a theme that was:
Mobile responsive:
Online shopping on mobile devices is increasing day by day, so choose a theme that can be used on both desktop and mobile.
Optimized for e-commerce:
The product gallery, shopping cart, and checkout pages should be integrated into the theme.
Compatible with page builders like Elementor:
With the help of the Elementor plugin, website page design can be customized without using any coding language.
After exploring various options, I narrowed it down to three favorites:
Astra: A lightweight and fully customizable theme, Astra offers pre-built templates designed specifically for e-commerce.
OceanWP: OKnown for its versatility, OceanWP offers a variety of features and extensions designed for online stores.
Storefront: Built with WooCommerce, Storefront was a natural choice for its seamless integration and functionality.
Each of these themes has a visually appealing and attractive design and is a great choice for creating an e-commerce website.
3: Setting Up WooCommerce
My store is powered by WooCommerce. It is very easy to install and can be done in a few steps or clicks in the WordPress dashboard.
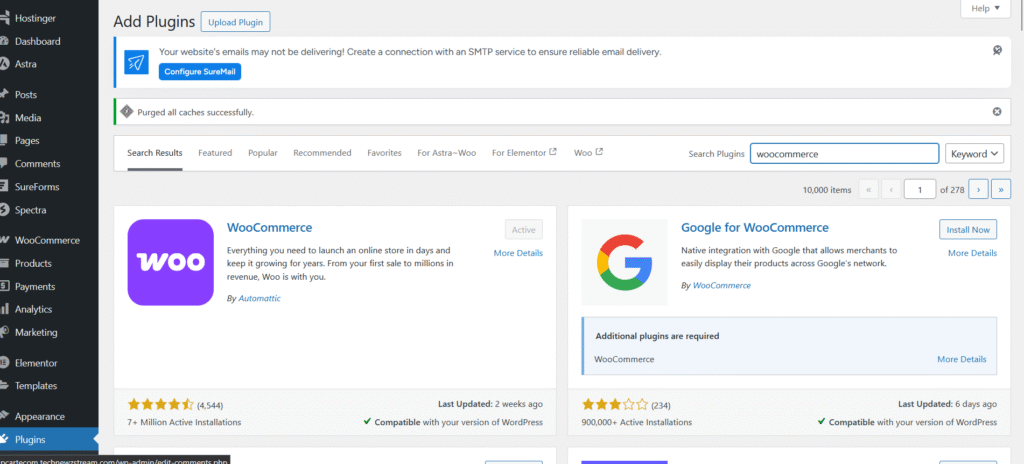
Installing WooCommerce :
First, I went to the plugins option in my WordPress dashboard and searched for WooCommerce by clicking on “Add New”. After doing this, I clicked on “Install Now” and then “Activate”. The process was completed in a very short time and my online store was ready to be designed.
Initial Setup –
Once WooCommerce is working, you can go into all the options and practice. It is a very easy interface . Here are the important steps that I followed while building the website:
Store Description:
I will enter my store address, currency, and the type of products you plan to sell (physical, digital, or both).
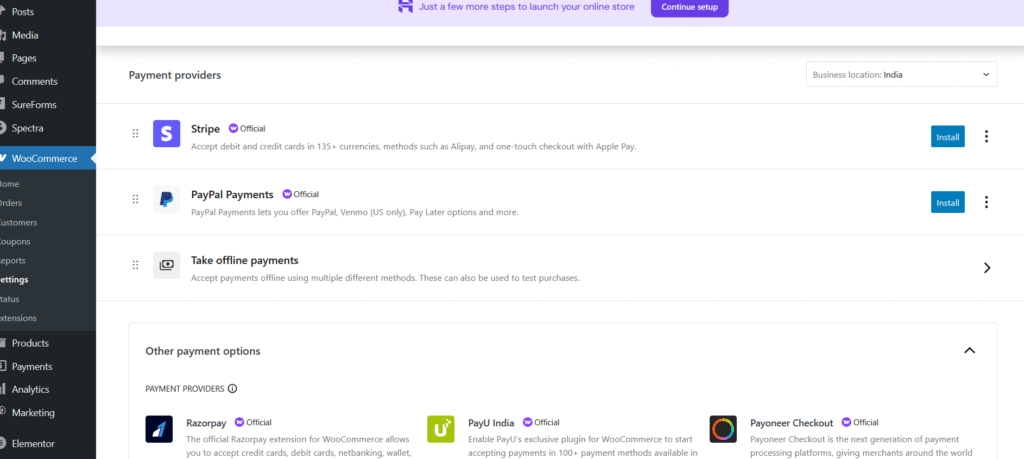
Payment Gateway:
I selected payment methods like Stripe and PayPal for secure transactions. With support for local payments and Razorpay for UPI payments in WooCommerce, I chose Razorpay, which is used by many people.
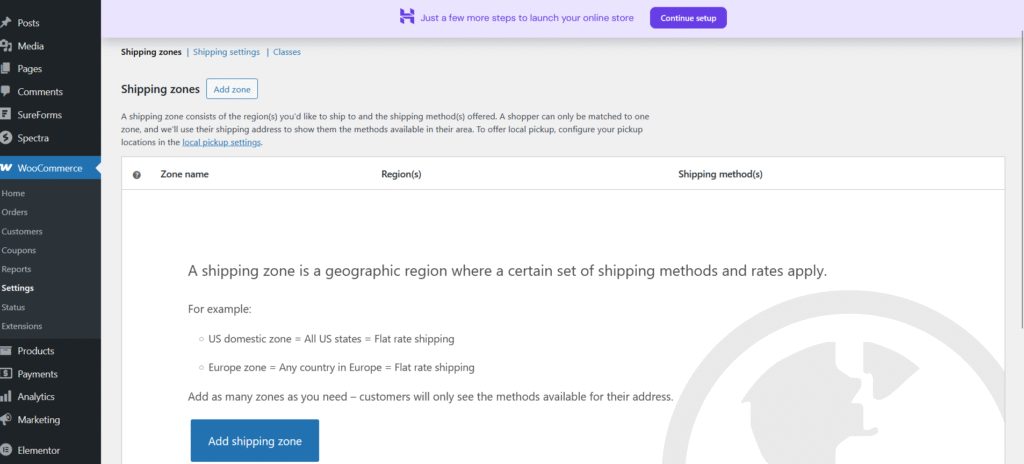
Shipping Options:
I will enter shipping zones and rate methods. For example, you can set free shipping for local customers in my store and flat rate for other regions.
Tax Settings: I enabled automatic tax calculation to ensure compliance with local tax laws.
Customizing WooCommerce
After the initial setup, I explored WooCommerce’s settings to tailor the platform to my needs. I customized email templates, added my store’s logo, and configured additional settings like inventory management and customer accounts.
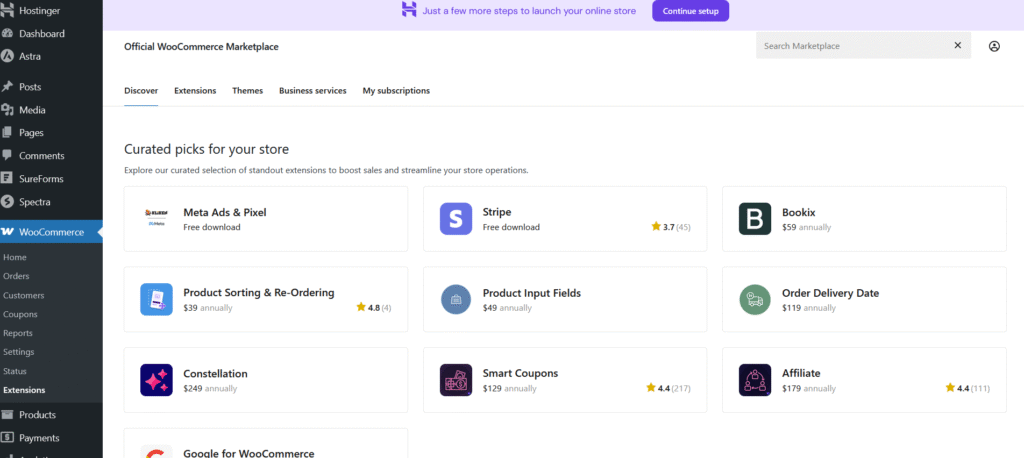
Adding Extensions
You need to download extensions from WooCommerce’s extension library to make it look good. I need to install plugins to add features like subscription billing, product add-ons, and real-time shipping rates. This increases the number of customers and sales in my store.
4: Adding Products to My Store
This is where things get exciting. I started uploading products with detailed descriptions, high-quality images, and clear pricing.
Here’s how I did it:
Uploading Products
Product Title: I created clear and concise titles with relevant keywords to improve search visibility.
Product Description: I wrote detailed and engaging descriptions highlighting the features and benefits of each product.
Product Images: I uploaded high-quality images from multiple angles to give customers a better idea of the product.
Pricing: I set competitive prices and added discounts or offers to attract buyers.
Organizing Products
Categories: I divided the products into categories to make navigation easier for customers.
Tags: I added tags to help customers find products through search and filters.
Attributes: I defined attributes like size, color, and material to provide more options for customers.
SEO tips I followed
Keywords: I used primary and secondary keywords to rank within the product title.
Alt text: I added alt text to images for accessibility and SEO.
Meta description: I needed to write engaging and quality meta descriptions to increase click-through rates from search results.

5: Installing Essential Plugins
To enhance my ecommerce business website, I installed a few must-have plugins. Here’s a detailed breakdown:
How to Add Plugins
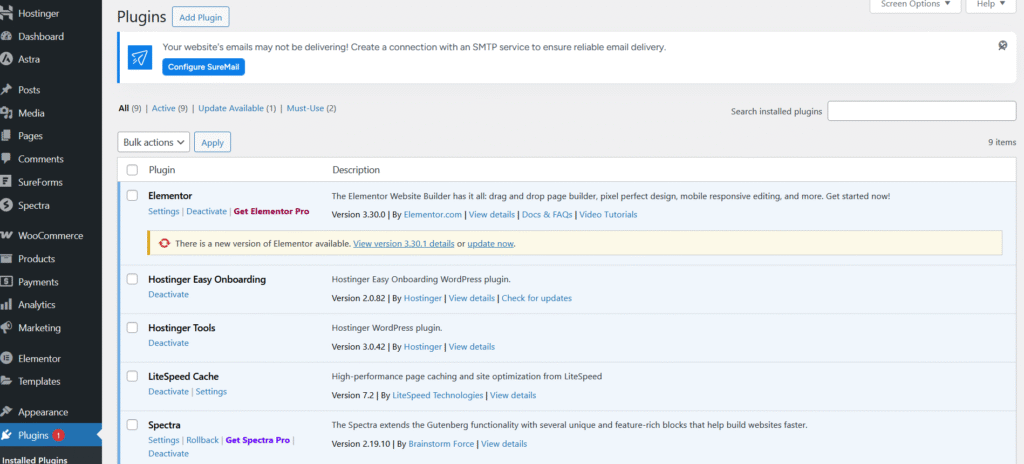
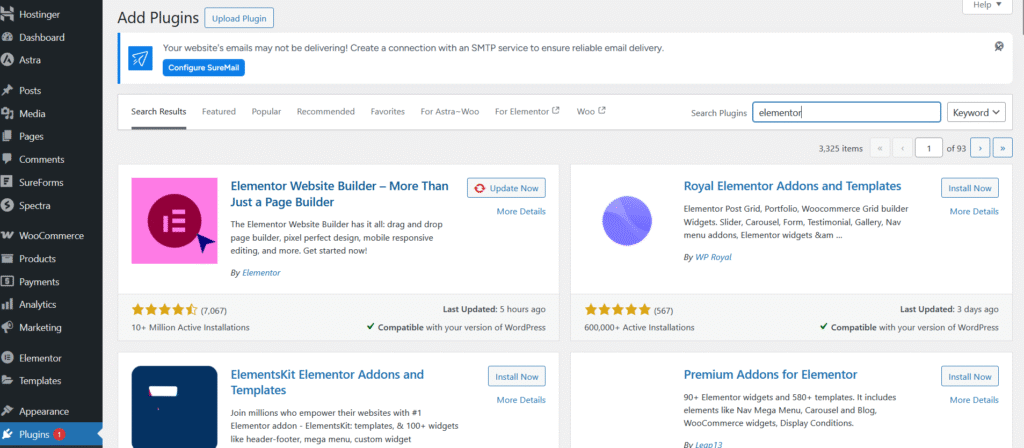
Adding plugins to your WordPress site is a straightforward process. Here’s how I did it:
- Navigate to the Plugins Section: From the WordPress dashboard, click on “Plugins” and then “Add New.”
- Search for Plugins: Use the search bar to find specific plugins by name or functionality.
- Install Plugins: Once you find the desired plugin, click “Install Now.”
- Activate Plugins: After installation, click “Activate” to enable the plugin on your site.
- Configure Settings: Many plugins have their own settings page where you can customize features to suit your needs.
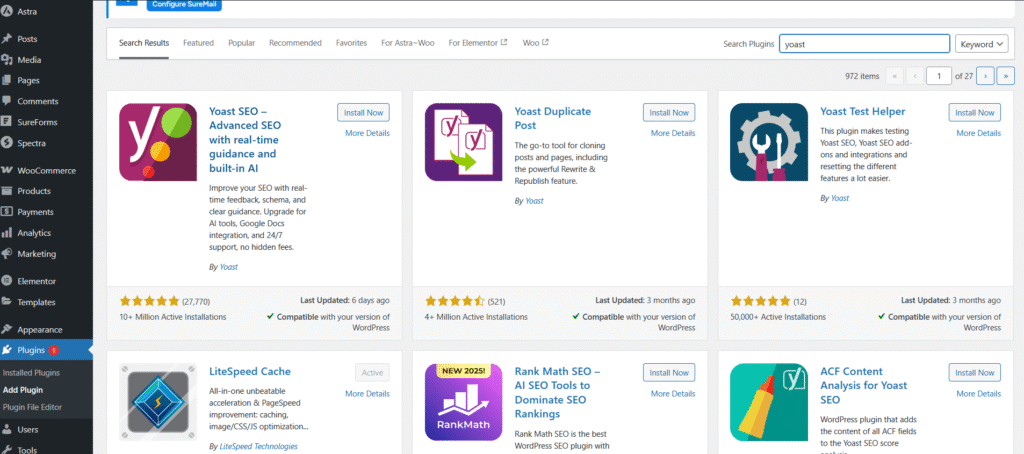
SEO Plugins
- Rank Math: This plugin helped me optimize my site for search engines by providing suggestions for keywords, meta descriptions, and schema markup.
- Yoast SEO: Yoast made it easy to improve on-page SEO with its readability analysis and focus keyword features.
Performance Plugins
- WP Rocket: I used WP Rocket to speed up my website by enabling caching, lazy loading, and file compression.
- W3 Total Cache: This plugin further improved site performance by optimizing database queries and reducing server load.
Security Plugins
- Wordfence: Wordfence provided real-time threat detection and firewall protection to keep my site secure.
- Sucuri: Sucuri added an extra layer of security with malware scanning and DDoS protection.
Marketing Plugins
- Mailchimp: I integrated Mailchimp to create email campaigns and manage subscriber lists effectively.
- OptinMonster: OptinMonster helped me design pop-ups and lead capture forms to grow my email list.
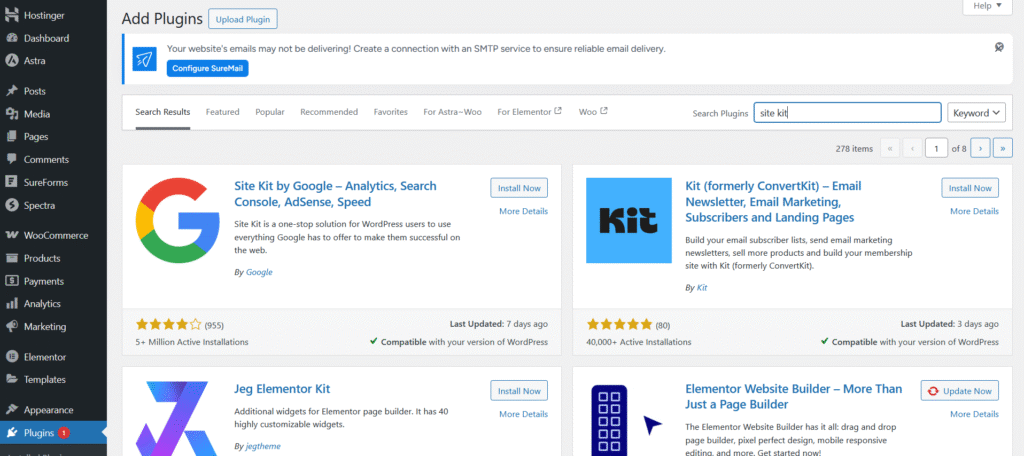
Analytics Plugins
- Site Kit: This plugin connected my site to Google Analytics, Search Console, and AdSense for comprehensive performance tracking.
- MonsterInsights: MonsterInsights provided detailed reports on user behavior and traffic sources, helping me refine my marketing strategies.
- These plugins played a crucial role in improving my site’s functionality, security, and user experience.
6: Designing Your Store/Website
This is how your e-commerce site truly comes to life. A well-designed store builds trust, enhances user experience, and speeds up conversions.
Now, let’s take a look at how to design your store. It builds customer trust and improves user experience.
Using a Page Builder
I used Elementor to customize the layout and design, which is a user-friendly page builder.
These help make it more appealing:
Write product features and create custom sections for testimonials. Adjust fonts, colors, and spacing, and make sure the website looks good on desktop, tablet, and mobile.
If you don’t want to use Elementor, other great options include Beaver Builder and WPBakery, although Elementor is great for beginners and is the easiest to use for most people.
Key Store Pages I Designed
Here’s how to design each page:
Page Design Focus
Homepage Eye-catching hero section, featured products, clear navigation
Shop Page Product filters, grid layout, seamless sorting
Product Page High-quality images, reviews, trust badges, CTA buttons
Cart & Checkout Clean design, minimal steps, secure payment visuals
Contact/About Clear business info, personalized touch, FAQs
Mobile Responsiveness
With most traffic coming from phones, I ensured:
- Menus were touch-friendly
- Buttons were easy to tap
- Text and images scaled properly across screens
Trust Signals & Conversion Boosters
I incorporated:
- Customer reviews and star ratings
- Security badges and SSL trust icons
- Guarantees like “30-day returns” to reduce buying hesitation
- Live chat plugin (like Tidio) to engage visitors in real time
Branding Consistency
To make my store feel cohesive and memorable, I focused on:
- Using a consistent color palette and typography
- Highlighting my logo across key pages
- Maintaining a clear tone of voice in all content
7: Setting Up Payment Gateways
You need to set up a payment gateway for your e-commerce store to ensure secure and seamless transactions. Setting up a payment gateway is an important step. It will generate your income.
Here’s how I did it:
Selecting a payment gateway
I selected some payment gateways:
Security: Ensure that customer data is encrypted and protected during transactions.
Ease of use: Provide a smooth checkout experience for customers.
Global reach: Support international payments for a wider audience.
Local options: With gateways like Razorpay for regional transactions.
Stripe and PayPal integration
Stripe: Known for its strong security features and support for multiple currencies, Stripe was an ideal choice for my store.
I created a Stripe account and linked it to my business bank account.
Using the WooCommerce Stripe plugin, I integrated Stripe into my store.
I configured settings for payment methods like credit cards and Apple Pay.
PayPal: A trusted name in online payments, PayPal offers convenience and reliability.I signed up for a PayPal business account.
Using the WooCommerce PayPal plugin, I added PayPal as a payment option.
I enabled features like Express Checkout for faster transactions.
9: Optimizing for SEO & Speed
Your e-commerce store needs to optimize its website for SEO and speed to attract visitors and provide a seamless user experience.
On-page SEO
Keyword research: I identified high-traffic keywords relevant to my product and niche using Google Keyword Planner and SEMrush tools.
Content optimization: I naturally included primary and secondary keywords in product titles, descriptions, and blog posts.
Meta tags: I wrote catchy meta titles and descriptions for each page to improve click-through rates.
Internal linking: I added links between related pages to improve navigation and distribute link equity.
Alt text: I added descriptive alt text to images to improve accessibility and SEO.
Technical SEO
XML sitemap: I created an XML sitemap using a plugin like Yoast SEO to help search engines index my site.
Robots.txt: I configured the robots.txt file to guide search engine crawlers.
Schema Markup: I added structured data to product pages to improve search engine visibility.
Canonical URLs: I set up canonical URLs to prevent duplicate content issues.
Speed Optimization
- Image Compression: I used tools like TinyPNG and ShortPixel to reduce image file sizes without compromising quality.
- Caching: I installed caching plugins like WP Rocket to store static versions of pages and speed up loading times.
- Lazy Loading: I enabled lazy loading for images and videos to improve page load speed.
- Minification: I minified CSS, JavaScript, and HTML files to reduce their size and improve performance.
- Content Delivery Network (CDN): I integrated a CDN like Cloudflare to deliver content faster to users across the globe.
Mobile Optimization
- Responsive Design: I ensured my site’s layout adapted seamlessly to different screen sizes.
- Touch-Friendly Elements: I optimized buttons and menus for easy navigation on mobile devices.
- Core Web Vitals: I focused on improving metrics like Largest Contentful Paint (LCP), First Input Delay (FID), and Cumulative Layout Shift (CLS).
Testing and Monitoring
- Google Analytics: I tracked user behavior and traffic sources to identify areas for improvement.
- Google Search Console: I monitored site performance and fixed issues like crawl errors and broken links.
- Page Speed Insights: I used Google’s PageSpeed Insights tool to analyze and optimize loading times.
- A/B Testing: I conducted A/B tests to compare different design elements and improve conversion rates.
These strategies helped me achieve better search engine rankings, faster load times, and a more user-friendly ecommerce store.
10: Launching & Promoting My Store
Before going live, I ran through a pre-launch checklist:
- Tested checkout flow
- Checked mobile responsiveness
- Connected Google Analytics and Search Console
Promotion Strategies I Use:
- Blogging (like this post!)
- Social media marketing
- Email campaigns with ConvertKit
Tracking performance helped me refine my strategy and grow my audience.
Summary
This comprehensive guide walks you through the process of building an ecommerce website using WordPress and WooCommerce. It covers everything from choosing the right hosting and domain to optimizing your site for SEO and speed. Key steps include:
- Choosing WordPress and WooCommerce: Learn why these platforms are ideal for ecommerce, offering ease of use, customization, and scalability.
- Setting Up Hosting and Domain: Tips for selecting reliable hosting providers and memorable domain names.
- Installing WordPress and Themes: Step-by-step instructions for setting up WordPress and choosing mobile-responsive, ecommerce-optimized themes.
- Configuring WooCommerce: A detailed walkthrough of setting up WooCommerce, including payment gateways, shipping options, and tax settings.
- Adding Products: Best practices for uploading products with engaging descriptions, high-quality images, and SEO-friendly details.
- Installing Essential Plugins: Recommendations for plugins to enhance SEO, performance, security, and marketing.
- Designing Your Store: Tips for creating a visually appealing and user-friendly store using page builders like Elementor.
- Setting Up Payment Gateways: Guidance on integrating secure and user-friendly payment options like Stripe, PayPal, and Razorpay.
- Configuring Shipping and Taxes: Strategies for setting up transparent and efficient shipping and tax systems.
- Optimizing for SEO and Speed: Techniques for improving search engine rankings and site performance, including keyword research, caching, and mobile optimization.
- Launching and Promoting Your Store: Pre-launch checklists and promotion strategies like blogging, social media marketing, and email campaigns.
By following these steps, you can create a professional and successful ecommerce website that drives traffic and conversions.
Conclusion
Building an ecommerce website with WordPress and WooCommerce is a journey filled with learning, creativity, and growth. From the initial setup to the final launch, every step offers an opportunity to refine your skills and create something truly impactful.
The process begins with choosing the right tools and platforms that align with your business goals. WordPress and WooCommerce provide the flexibility and scalability needed to adapt to your evolving needs. As you progress, you’ll discover the importance of thoughtful design, effective marketing strategies, and continuous optimization.
Launching your store is just the beginning. The real challenge lies in promoting your brand, engaging with customers, and staying ahead of industry trends. By leveraging SEO techniques, social media platforms, and data analytics, you can build a strong online presence and drive sustainable growth.
Remember, success in ecommerce is not just about selling products; it’s about creating value for your customers and building lasting relationships. Stay committed to delivering quality, innovation, and exceptional service, and your store will thrive in the competitive online marketplace.
So, take the first step today and embark on your ecommerce journey with confidence. The tools and resources are at your fingertips—now it’s time to turn your vision into reality.